Monday, August 20, 2007

Graduated Neutral Density Filters

Before the digitial age, people used filters alot more in photography. One filter used especially in landscape work was/(still is sometimes) is the Graduated Neutral Density Filter. We'll call it a Grad ND filter from here on. The filter is clear on one half, and dark on the other. Usually has a graduation in between. Either hard edged, where it's goes from clear to dark quicky, or a soft edge where it's graduates more over some space.


The reason for these filters is to bring the light range of the image you are shooting to be more even. Cameras can only capture a finite range of light. We call this stops of light. The human eye can see almost twice the range...also caled Dynamic Range. Picture a scene where the sky is bright, and the ground is dark. The range between the sky and the ground is too drastic to capture in an image. So, this is where the grad ND filter came in. By putting the dark half over the sky, the brightness of the sky is lowered closer to the ground to give an even exposure.


With digital, we can mimick a ND filter using photoshop. First you need a scene to shoot. Shoot the scene with 2 shots of exactly the same frame. Just expose one for the sky, and one for the ground. Once you got this, follow these steps.


Load in the first image, the one shot for sky into photoshop.


Then load in the shot exposed for the ground.

Next select the one exposed for ground, click ctrl-a to select all. then ctrl-c to copy.


Then click on the image exposed for sky and press ctrl-p. This will past the other image on top. You'll see the image has 2 layers now. I highlighted this in magenta.


Next add a layer mask, (make suer the top layer is highlighted in the layers box on the right) The layer mask button is on in the bottom right. You should see a white box appear in the top layer.

Once you have a layer mask, click on the layer white box of the layer mask. Then click the gradient tool, and make sure you have black and white colors selected. Next click and drag the tool, while sholding shift to draw a vertical line. This will fill in one half with black, one half with white, and anything in the range you selected with a gradient in between.


You can now see the layer maks has the black and white in it. Anything in this layer that has black in the mask is invisible, so the layer beneath will show through. White will only show the top layer. Any gray in between will blend depending on how white or black. This is how we get a nice soft edge to the gradient.

The final image looks something like this.


Hope you find this method useful. In situations where the horizon isn't very straight, you may have to use other methods which I'll get into in the future.

Thursday, July 5, 2007

How to Shoot Lightning

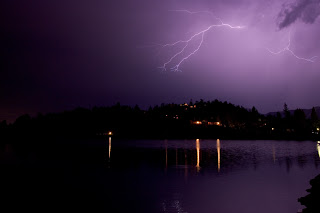
Last summer we had a small thunderstorm up here in Big Bear Lake. I took it as an opportunity to take some lightning shots.


My first attempts at lightning go back about 11 years, when I tried to shoot lightning using my reflexes...needless to say nothing came out. Few years later, armed with a better camera, I tried again during a storm, and only got a few keepers. Either my reflexes got better, or I was lucky.

It made me realize there must be a better way to shoot lightning...after some research and thought, I learned the secret...and today I'll share the secret to getting lightning shots like this:


You'll need a few tools to shoot lightning. One is a good camera, preferably a digital SLR. Although film SLR will work, as well as some point and shoot models (One that allows longer shutter speeds). You'll also need a tripod to keep the camera steady. And the final item, is a cable release...this will greatly increase your ability to shoot lightning.

Here are the steps to follow for shooting lightning (These are based on using a digital SLR, other cameras would be similar):

  1. Start with a wide angle lens to cover more sky area, this will give you a better chance of getting lightning.
  2. Set the camera up on a tripod facing an area you think lightning will strike. Sometimes it's good to include some ground for a reference in the shot.
  3. Set the aperture to around F5.6 to F8, and the ISO to around 100 or 200.
  4. Set your shutter speed to 4 seconds. You can go longer if you want, you may have to play with the settings to get a good exposure.
  5. If your camera has long exposure noise reduction, turn it off. How this feature works, is it takes a dark frame (shutter closed) after the regular frame, and subtracts it. The problem with this is the dark frame takes the same amount of time, so a 4 second exposure, takes 4 seconds of exposure, and 4 seconds of dark frame. And it's during those 4 seconds it's doing the dark frame that lightning will strike if your as lucky as me. =)
  6. Focus the image. If you can get auto focus to work, that's fine, but once it's in focus switch to manual so the focus doesn't change (or delay exposures)
  7. Set the camera to continuous shooting mode.
  8. Use the cable release to start shooting. Some cable releases, have a lock that will hold the shutter button down. This will make the camera continually shoot non stop, until the digital media card (Compact Flash, etc) is full.
  9. If lightning strikes any time during the exposure, you will capture it.
  10. Once you are finished, delete any of the "bad" images. Keep all the ones with lightning on them. This is where digital has the advantage...with film, you waste a lot of film to only get a few shots. If you are using film, try lengthening the exposure time to 15-30 seconds. This will use less film.

One thing to understand is lightning is EXTREMELY bright, and it flashes really fast. The length of the flash is all you need for exposure, since the area is mostly dark, the long exposure won't show much, except lightning when it flashes.

Finally, the most important thing of all. Don't risk your life. Lightning strikes kill. If you think the storm is getting to close, leave the area.

Good luck, and if you're lucky you may come out with some great lightning shots.


Wednesday, June 13, 2007

Trip To Rock Creek June 2007

Last weekend, I took a trip to to Rock Creek. Rock Creek Canyon is one of my favorite locations in the Eastern Sierras. With a trailhead at approx 10,500 feet above sea level, the creek itself is clean, clear and really cold. The trail travels into an area called Little Lakes Valley, which is a valley comprised of a series of alpine lakes. Each lake has it's own unique look and beauty.


My wife and I left early in the morning to start our hike. Unfortunatly we missed the pre sunrise time period, but we did arive at the trailhead before 5:30. The temperature was cold, still in the low 30s from the night before.

A few hundred yards from the trailhead the trail follows the creek. Seen in the image below. The peaks in the background of this shot are approx 13,000 feet high. Even in June they still have snow. The creek here is Rock Creek, there are lots of small brook trout throughout this lake, a great place forfishing. Alot of anglers and fly fishers love to fish here. The fishing is also good at Rock Creek Lake.


Rock Creek Lake which is about 1 mile before reaching the trailhead along Rock Creek Road, is a popular place for fishers. The lake has lots of large Rinbow and Bown Tout. Most of the back country lakes and the creek itself contains smaller Brook Tout, as well as some Rainbow and the very beautiful Golden Trout.

After about 15 mins of hiking and enjoying the peace and quiet of the early morning, we came to the second lake. Marsh Lake. The water of this lake was smooth as glass in the still morning air. Makes for a great reflection shot. I arrived here at Marsh Lake just as the early morning warm sunlight was disapating.


After walking a good ways from Marsh Lake we came upon Heart Lake. This one was one of my favorites. There's a beautiful meadow near the lake with a few streams flowing in and out of the lake. Very beautiful area. We stopped off near the shore line and I took this shot here.

Because these lakes are at such high altitude, the water remains very cold even through summer. Since there is nothing above these areas, the water remains unpolluted and crystal clear. Hopefully these lakes will remain clean and pollution free forever.
We hiked a total of 2 miles each way on our trip, our last stop was Long Lake. When at Long Lake we saw a few trout swimming around near the shoreline. At one point we were lucky enough to find a trout that was feeding off the surface of the water. I took the opportunity to snap off a few shots.


Little Lakes Valley is a beautiful Gem located in the Eastern Sierras of California. I enjoyed my trip and look forward to heading back there again.


Next time I'm there, I'm hoping to start my hike a little early to catch some of the better early morning light.

Welcome

Welcome to Luminous Exposure. This blog is deticated to all things Photography, from tips and tricks, to locations. Check back often.

Feel free to check out my main webpage and photo gallery at http://www.luminous-exposure.com/