
For years now I've been wanting to see the Columbia River Gorge in Oregon. In a few weeks we'll be leaving for Oregon/Washington/Idaho and Montana. I'm finally going to get to see the gorge. We leave April 28th for the SF bay area. Then Oct 2nd we head up to Crater Lakes. After that it's off to our friends place in Yakima, WA. From there we will visit areas in Northern Oregon and Washington. And a short trip over to ID and MT.
I also get to try out my new camera on this trip. Hoping to get some great photos.
This trip will add 4 new states to my states I've been to list. After this I'll have 12 states I haven't been to:
Alaska
Arkansas
Hawaii
Kentucky
Michigan
Minnesota
Oklahoma
South Dakota
Tennesee
Vermont
Wisconsin
My plan is to update this blog with the details of our trip. Hopefully I can post some photso as well. So at the end of this month check back to see updates.
Thursday, April 8, 2010
Sunday, October 11, 2009
Someone please explain this...
Today was a reasonably warm day. Up near 70 today. I took this photo here at 4pm of our thermometer.
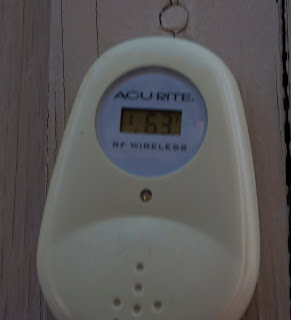
As you can see it is 63º F outside. A nice decent temperature. Inside our house it's a little stuffy, around 73 degrees, so I have the windows open to enjoy the nice fresh air. And so it will cool down a little bit in here.
Except the air is not all that fresh. This next photo was taken about 20 seconds after the above photo. It's the house on the street behind our house.
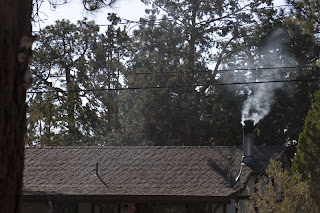
Please someone explain why one would need to burn in thier fireplace when it is 63º? And for that matter, why people can't burn dry wood, instead of green evergreen wood that smokes like this. Every night we have to shut our windows because of this. There are times it's so hot and stuffy in the house, I need to run an Air Conditioner, even though it's in the 50's outside.
Wednesday, September 30, 2009
Busy, Busy, Busy
I started this blog about 2 years ago, and didn't post much. Seems work got in the way. My job sometimes takes up way too much of my time leaving me with little free time. I've been on overtime (60 hours a week) since February, and I definatly need a break. Hopefull this is my last week of overtime.
What I'm hoping to do is post more often. Yesterday I posted about one of my favorite photographs, so I think I may continue doing that. Hope to see you back here.
What I'm hoping to do is post more often. Yesterday I posted about one of my favorite photographs, so I think I may continue doing that. Hope to see you back here.
Tuesday, September 29, 2009
My best (Water)Fall photo ever...

2 years ago I had the opportunity to go to Ricketts Glen State Park in Pennsylvania. About a 2 hour drive from where my parents were living, we went there for a day of hiking. Rickett's Glen has 21 waterfalls, about 17 of them can be seen in a single hiking loop. I photographed 16 of them on our trip. We got there in November so the fall color was starting to fade as it was late in the season. But there was still a good deal of orange leaves around there. My favorite shot is of this specific waterfall. I believe it's named R.B. Ricketts Falls
When we got there it was mostly overcast, but by the time we finished the hike, the sun was poking through clouds. When I took the above photo, the sun just started peeking out and backlit the leaves giving them an almost unreal glow.
I definatly want to go back to Rickett's Glen again, and this time photograph all of the 21 waterfalls. If you'd like to see most of them, you can check out the rest of my photos from the trip here:
Sunday, September 27, 2009
Eastern Sierra Fall Color Report 9-26-09
Before I go into the details of the fall color and the locations I visited, I wanted to warn anyone going, be careful. I seen more reckless drivers over this past weekend then I've seen ever. On Rock Creek Road above the lake, I was almost hit head on a few times by people driving 30-40 mph on the one lane section. Most of the drivers wouldn't even move to the side of the road and slow down. The worse section of road was near Lake Sabrina, one guy driving a large truck ran me off the road.
But by far the worse thing I saw was a woman driving a Ford Taurus wagon almost running over a pedestrian. Just below Lake Sabrina, 2 female photographers pulled over on the one side of the road near a bridge. When one of them was crossing the street, the driver in the taurus doing about 30-40mph came up behind her. Instead of slowing down, they floored the gas as they went around the pedestrian, scaring her because she couldn't hear the car comming. So watch yourselves out there.
Ok onto the report. My trip started out friday night (Sept 25) when we drove up to Eastern Sierras from Big Bear Lake. I decided we'd camp in Rock Creek area. So we drove up Rock Creek Road. All of the smaller campgrounds were full, so we stayed at East Fork, which was less then half full. Next morning we woke up at 5am and drove to North Lake in Bishop Creek Canyon. Most of my best photos were in this area. I'd say most of the trees are near peak or peak here. There are still some green trees around, but all and all I'd say it's good here.
The sunrise was great.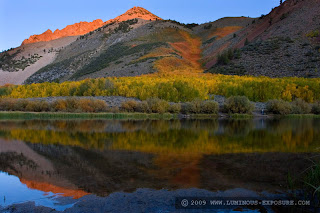
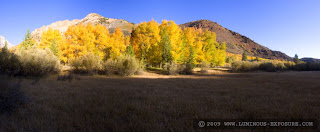
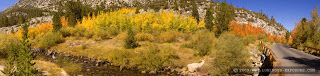
As the sun came up farther in the sky, it lit up the area. And I took this panoramic.
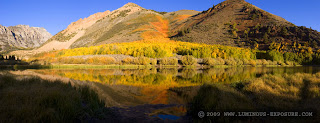
This is from a meadow near North Lake.
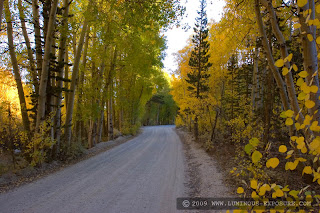
 The road from North Lake to the campground.
After North Lake and the area's around there, I went up to Lake Sabrina. Some good color here.
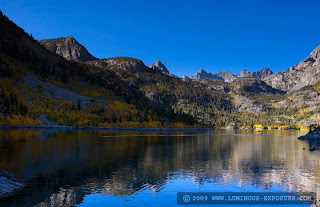 After this area the sun was up pretty high and the photography wasn't as good, so we returned to the campground in Rock Creek. The trees in East Fork Campground were half yellow half green. The trees above Rock Creek Lake were peaking or past peak. Some of the leaves already fell off the trees. But there was good color here and there.
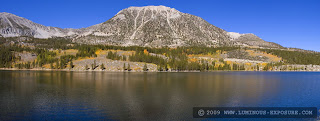
Panoramic of Rock Creek Lake
Panoramic of Rock Creek between the lake and Mosquito Flat
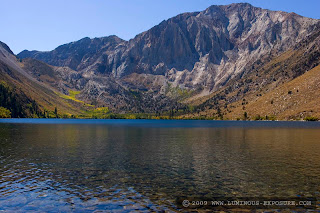
We left later in the afternoon to head home. On the way I stopped at Convict Lake and took this shot. There's a little color here but it's got a way to go yet.
You can see the rest of the photos from our trip on my Flickr album.
http://www.flickr.com/photos/42490701@N05/sets/72157622343043947/
You can see my other photography at my website.
www.luminous-exposure.com/pics.html
But by far the worse thing I saw was a woman driving a Ford Taurus wagon almost running over a pedestrian. Just below Lake Sabrina, 2 female photographers pulled over on the one side of the road near a bridge. When one of them was crossing the street, the driver in the taurus doing about 30-40mph came up behind her. Instead of slowing down, they floored the gas as they went around the pedestrian, scaring her because she couldn't hear the car comming. So watch yourselves out there.
Ok onto the report. My trip started out friday night (Sept 25) when we drove up to Eastern Sierras from Big Bear Lake. I decided we'd camp in Rock Creek area. So we drove up Rock Creek Road. All of the smaller campgrounds were full, so we stayed at East Fork, which was less then half full. Next morning we woke up at 5am and drove to North Lake in Bishop Creek Canyon. Most of my best photos were in this area. I'd say most of the trees are near peak or peak here. There are still some green trees around, but all and all I'd say it's good here.
The sunrise was great.

As the sun came up farther in the sky, it lit up the area. And I took this panoramic.

This is from a meadow near North Lake.
 The road from North Lake to the campground.
After North Lake and the area's around there, I went up to Lake Sabrina. Some good color here.
 After this area the sun was up pretty high and the photography wasn't as good, so we returned to the campground in Rock Creek. The trees in East Fork Campground were half yellow half green. The trees above Rock Creek Lake were peaking or past peak. Some of the leaves already fell off the trees. But there was good color here and there.
Panoramic of Rock Creek Lake

Panoramic of Rock Creek between the lake and Mosquito Flat

We left later in the afternoon to head home. On the way I stopped at Convict Lake and took this shot. There's a little color here but it's got a way to go yet.

You can see the rest of the photos from our trip on my Flickr album.
http://www.flickr.com/photos/42490701@N05/sets/72157622343043947/
You can see my other photography at my website.
www.luminous-exposure.com/pics.html
Monday, August 20, 2007
Graduated Neutral Density Filters
Before the digitial age, people used filters alot more in photography. One filter used especially in landscape work was/(still is sometimes) is the Graduated Neutral Density Filter. We'll call it a Grad ND filter from here on. The filter is clear on one half, and dark on the other. Usually has a graduation in between. Either hard edged, where it's goes from clear to dark quicky, or a soft edge where it's graduates more over some space.
The reason for these filters is to bring the light range of the image you are shooting to be more even. Cameras can only capture a finite range of light. We call this stops of light. The human eye can see almost twice the range...also caled Dynamic Range. Picture a scene where the sky is bright, and the ground is dark. The range between the sky and the ground is too drastic to capture in an image. So, this is where the grad ND filter came in. By putting the dark half over the sky, the brightness of the sky is lowered closer to the ground to give an even exposure.
With digital, we can mimick a ND filter using photoshop. First you need a scene to shoot. Shoot the scene with 2 shots of exactly the same frame. Just expose one for the sky, and one for the ground. Once you got this, follow these steps.
Load in the first image, the one shot for sky into photoshop.

Then load in the shot exposed for the ground.

The reason for these filters is to bring the light range of the image you are shooting to be more even. Cameras can only capture a finite range of light. We call this stops of light. The human eye can see almost twice the range...also caled Dynamic Range. Picture a scene where the sky is bright, and the ground is dark. The range between the sky and the ground is too drastic to capture in an image. So, this is where the grad ND filter came in. By putting the dark half over the sky, the brightness of the sky is lowered closer to the ground to give an even exposure.
With digital, we can mimick a ND filter using photoshop. First you need a scene to shoot. Shoot the scene with 2 shots of exactly the same frame. Just expose one for the sky, and one for the ground. Once you got this, follow these steps.
Load in the first image, the one shot for sky into photoshop.
Then load in the shot exposed for the ground.

Next select the one exposed for ground, click ctrl-a to select all. then ctrl-c to copy.

Then click on the image exposed for sky and press ctrl-p. This will past the other image on top. You'll see the image has 2 layers now. I highlighted this in magenta.

Next add a layer mask, (make suer the top layer is highlighted in the layers box on the right) The layer mask button is on in the bottom right. You should see a white box appear in the top layer.
Once you have a layer mask, click on the layer white box of the layer mask. Then click the gradient tool, and make sure you have black and white colors selected. Next click and drag the tool, while sholding shift to draw a vertical line. This will fill in one half with black, one half with white, and anything in the range you selected with a gradient in between.
You can now see the layer maks has the black and white in it. Anything in this layer that has black in the mask is invisible, so the layer beneath will show through. White will only show the top layer. Any gray in between will blend depending on how white or black. This is how we get a nice soft edge to the gradient.

The final image looks something like this.

Hope you find this method useful. In situations where the horizon isn't very straight, you may have to use other methods which I'll get into in the future.
Thursday, July 5, 2007
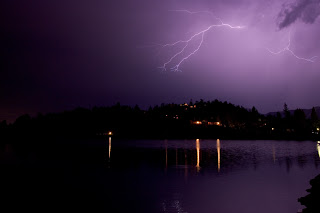
How to Shoot Lightning
Last summer we had a small thunderstorm up here in Big Bear Lake. I took it as an opportunity to take some lightning shots.
My first attempts at lightning go back about 11 years, when I tried to shoot lightning using my reflexes...needless to say nothing came out. Few years later, armed with a better camera, I tried again during a storm, and only got a few keepers. Either my reflexes got better, or I was lucky.
It made me realize there must be a better way to shoot lightning...after some research and thought, I learned the secret...and today I'll share the secret to getting lightning shots like this:

You'll need a few tools to shoot lightning. One is a good camera, preferably a digital SLR. Although film SLR will work, as well as some point and shoot models (One that allows longer shutter speeds). You'll also need a tripod to keep the camera steady. And the final item, is a cable release...this will greatly increase your ability to shoot lightning.
Here are the steps to follow for shooting lightning (These are based on using a digital SLR, other cameras would be similar):
- Start with a wide angle lens to cover more sky area, this will give you a better chance of getting lightning.
- Set the camera up on a tripod facing an area you think lightning will strike. Sometimes it's good to include some ground for a reference in the shot.
- Set the aperture to around F5.6 to F8, and the ISO to around 100 or 200.
- Set your shutter speed to 4 seconds. You can go longer if you want, you may have to play with the settings to get a good exposure.
- If your camera has long exposure noise reduction, turn it off. How this feature works, is it takes a dark frame (shutter closed) after the regular frame, and subtracts it. The problem with this is the dark frame takes the same amount of time, so a 4 second exposure, takes 4 seconds of exposure, and 4 seconds of dark frame. And it's during those 4 seconds it's doing the dark frame that lightning will strike if your as lucky as me. =)
- Focus the image. If you can get auto focus to work, that's fine, but once it's in focus switch to manual so the focus doesn't change (or delay exposures)
- Set the camera to continuous shooting mode.
- Use the cable release to start shooting. Some cable releases, have a lock that will hold the shutter button down. This will make the camera continually shoot non stop, until the digital media card (Compact Flash, etc) is full.
- If lightning strikes any time during the exposure, you will capture it.
- Once you are finished, delete any of the "bad" images. Keep all the ones with lightning on them. This is where digital has the advantage...with film, you waste a lot of film to only get a few shots. If you are using film, try lengthening the exposure time to 15-30 seconds. This will use less film.
One thing to understand is lightning is EXTREMELY bright, and it flashes really fast. The length of the flash is all you need for exposure, since the area is mostly dark, the long exposure won't show much, except lightning when it flashes.
Finally, the most important thing of all. Don't risk your life. Lightning strikes kill. If you think the storm is getting to close, leave the area.
Good luck, and if you're lucky you may come out with some great lightning shots.

Subscribe to:
Comments (Atom)
